Before we get started let’s create a table
| Variable | Role | Example or explanation | Example IP |
| LOAD_BALANCER_IP | 10.10.10.160 | ||
| LOAD_BALANCER_FQDN | k3scl01 | ||
| SRV1_IP_ADDRESS | 10.10.10.161 | ||
| SECRET_TOKEN | Th1s_1s_a_v3ry_s3cr3t_t0ken_pl3as3_k33p_1t_s@f3 | ||
| NODE_TOKEN | Token taken from the server nodes for agent installations | ||
| SRV1_DNS_NAME | Master | K3s-CL01-01 | 10.10.10.161 |
| SRV2_DNS_NAME | Master | K3s-CL01-02 | 10.10.10.162 |
| SRV3_DNS_NAME | Master | K3s-CL01-03 | 10.10.10.163 |
| SRV4_DNS_NAME | Worker | K3s-CL01-04 | 10.10.10.164 |
| SRV5_DNS_NAME | Worker | K3s-CL01-05 | 10.10.10.165 |
| SRV6_DNS_NAME | Worker | K3s-CL01-06 | 10.10.10.166 |
Although optional it would be a good idea to create on your local DNS the entries for all nodes and especially for the load balancer ip.
SSH on your first node, get sudo privileges and run this command replacing the variables with your settings.
IMPORTANT NOTE: At the point pf writing Rancher 2.7.0 is supported on Kubernetes version 1.24 and bellow so before the deployment make sure you are installing a compatible release.
curl -sfL https://get.k3s.io | INSTALL_K3S_VERSION=v1.24.10-rc1+k3s1 sh -s - server \
--token=SECRET_TOKEN \
--tls-san SRV1_DNS_NAME --tls-san LOAD_BALANCER_IP \
--cluster-init
After it is finished check the installation
kubectl get nodes
Now add the other servers by connecting to them and
curl -sfL https://get.k3s.io | INSTALL_K3S_VERSION=v1.24.10-rc1+k3s1 sh -s - server \
--token=SECRET_TOKEN \
--tls-san SRV2_DNS_NAME --tls-san LOAD_BALANCER_IP \
--server https://SRV1_IP_ADDRESS:6443
After all three servers are finished on one of them
kubectl get nodes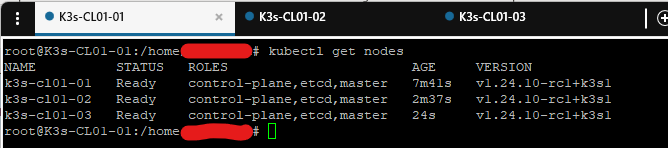
Now let’s add the worker nodes.
First let’s get the token from one of the Master nodes
cat /var/lib/rancher/k3s/server/node-tokenSSH to them, get sudo privileges and
curl -sfL https://get.k3s.io | INSTALL_K3S_VERSION=v1.24.10-rc1+k3s1 sh -s - agent \
--server https://LOAD_BALANCER_IP:6443 \
--token NODE_TOKEN
replacing the NODE_TOKEN with the result of the cat command on the previous step
NOTE: If you are using Ubuntu 22.04 on a Raspberry Pi like I am, make sure to install the linux extra modules for the pi first.
sudo apt install linux-modules-extra-raspiNow that all five nodes are configured.
kubectl get nodes
Congratulations you have an HA Kubernetes cluster!
For the Raspberry PI nodes you might want to add a label to them in order to differentiate them from the usual x86 or x64 architecture. Since they are PI4Bs in my case they have an ARM64 processor.
kubectl label nodes k3s-cl01-04 k3s-cl01-05 cputype=arm64This is totally optional and unless you are creating a custom application yourself you will not need it. You can use this label, which is free text, to deploy or not to deploy containers to these nodes. So if you type in
kubectl describe node k3s-cl01-04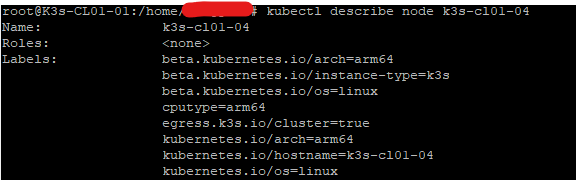
You can see the label added
NOTE: To uninstall k3s on the node:
/usr/local/bin/k3s-uninstall.shAnd on the cluster
kubectl delete node NODE_NAME